You can easily speed up and secure your internet by using the best DNS servers around today. DNS is a critical service for any device using the Internet.
Depending on which DNS servers you use will have a dramatic effect on both speeding up and securing your access to the Internet.
What are the best free and public DNS servers in 2020? This article will help you decide. Using one of the reviewed DNS providers will Speed up and secure your browsing history on-line.

Table of Contents
What is DNS?
DNS (Domain Name System) is a system service that translates the domain names that you enter (in a browser) to the IP addresses required to access those sites, and the best DNS servers provide you with the best and fastest service possible.
DNS is the directory of the Internet. Whenever you click on an Internet link, send an email, open a mobile app, the first thing that happens is that your device needs to look up the address of a domain.
For example:
When you access Microsoft.com, DNS translates the web site to 40.113.200.201
As of the first quarter of 2020, there are over 157.4 million domain name registrations.
Speed, Security and Privacy
Your Internet Service Provider (ISP) will assign your DNS servers whenever you connect to the internet, but these may not always be the best DNS server choice around. ISPs DNS servers are often slow and not privacy respecting. A slow DNS server can cause a noticeable lag before websites start to load, and if your server sometimes goes down, you may not be able to access any Internet sites at all.
It is recommended to switch to a free public DNS server. It can make a real difference, with more responsive browsing and lengthy 100% uptime records meaning there’s much less chance of technical problems.
One of my corporate clients was using a very expensive ISP who regularly took both primary and secondary DNS servers offline during weekend maintenance windows. Thus my client had no Point of Sale Credit Card access during these outages. I instantly recommended that they opt for changing their DNS from their ISP’s DNS servers to using the Google Public DNS servers, which should never go down or offline for maintenance (ever.)
Your DNS server can increase privacy on your use of the Internet. ISPs log all DNS queries and this is a basic step in lowering your “Internet access footprint” and increasing privacy.

If privacy is a major concern then the recommended primary step is to adopt the use of a Virtual Private Network (VPN) provider (covered in another article.)
Choose your DNS service with care – not all providers will necessarily be better than your ISP – but to help point you in the right direction, this article will highlight 3 of the best DNS servers around.
Primary DNS and Secondary DNS are a staple to the setup of any premium DNS service. Thus all of the providers will list both a primary and secondary DNS server address.
Recommended Best DNS Services
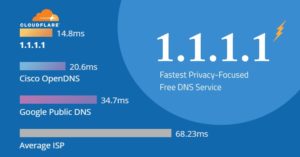
- Cloudflare 1.1.1.1, 1.0.0.1
This is one of the world’s best DNS server services for both web performance and privacy. The company released its brand new DNS service which is one of the best free and public DNS servers that you can use today.
Their new DNS server, the “1.1.1.1” is one of the fastest and privacy-first DNS servers available on the web.
Cloudflare never logs your IP address, which is what your ISP uses to track your internet habits. Internet Privacy and the speed of access is their primary service. The company has even hired KPMG to audit their systems annually to ensure that they’re delivering on their privacy promises.
Cloudflare is free to use, never logs your browsing data, and faster than usual DNS servers. I recommend Cloudflare and use this service for all home clients.

- Google Public DNS 8.8.8.8, 8.8.4.4
Google Public DNS service is the most popular free and public DNS servers on the planet. The Google Public DNS was launched in December 2009. and aims to make the internet more reliable and secure. According to their Google website:
“Google Public DNS protects users against various kinds of phishing attacks, especially if you are using older hardware to access the internet.”
One of the notable advantages you get by shifting to Google Public DNS is enhanced security and optimized speed. Google uses Anycast routing for finding the closest DNS server for data interaction to your internet location, thereby ensuring that you receive information in the shortest time possible.
Google Public DNS is free to use, brings speed enhancements, protects against phishing and DDoS attacks. Unfortunately, Google is logging your browsing history. I recommend and use this service for ALL business clients.
- Cisco OpenDNS 208.67.222.222, 208.67.220.220
OpenDNS is a free and public service provided by Cisco which is a the “giant” in the networking space. The Internet runs on Cisco.
OpenDNS gives you tools not only to access the internet in a fast and secure way but also prevents attacks from shoddy and forged clone websites.
It also blocks phishing websites along with the ones which have been flagged for carrying malware. Just like Google Public DNS, OpenDNS uses Anycast routing to route your connection to your nearest DNS servers to serve you faster page load times.
OpenDNS is free for personal use, brings speed enhancements, protects against phishing attacks, malware attacks, and cloned websites. Unfortunately, OpenDNS logs all DNS traffic that is received.
How to set your DNS Servers in Windows 10
If you’ve never changed your DNS address, you are using your ISP DNS servers. It is really easy to change the DNS server and by doing so, you can enhance the privacy and security (and speed, to some extent) of your device.
A DNS is a string of numbers that you’ll need to enter so it can connect to the internet.
- Go to the Windows Settings by pressing the right mouse button on the Windows logo key and selecting “Settings” or press Windows Logo key and type “settings” and select “Settings” from the menu.
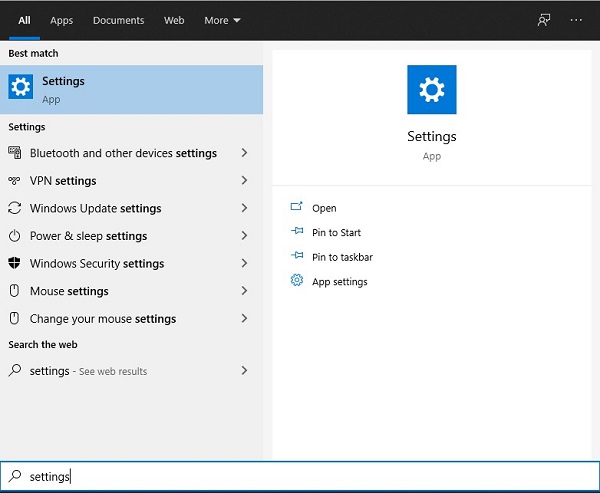
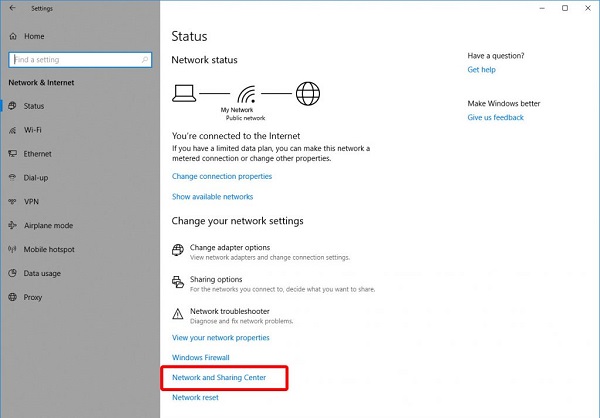
- Click on Network and Internet
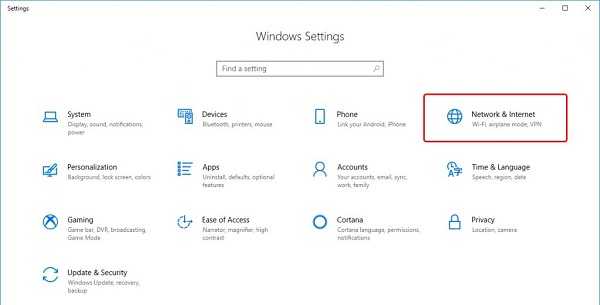
- Click on Network and Sharing Center
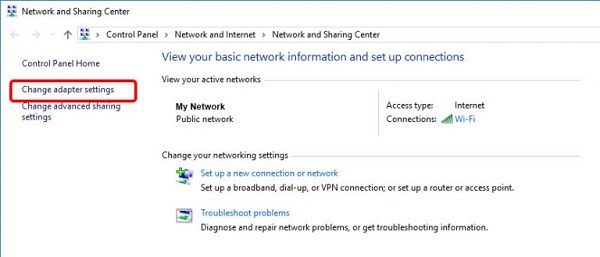
- Go to Change Adapter Settings.
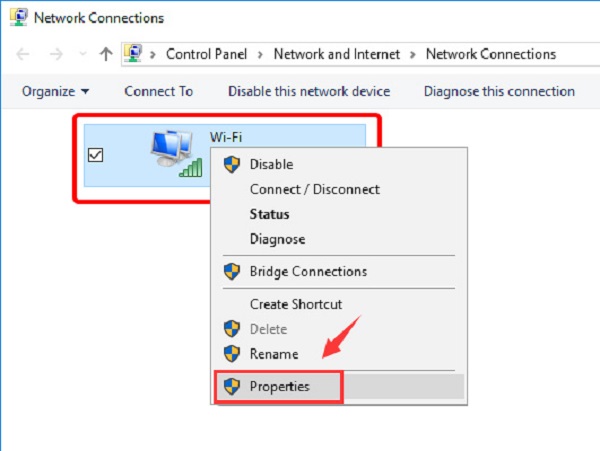
- You’ll see your network icons here. Select the network you’re currently connected to and right-click on it. Select Properties.
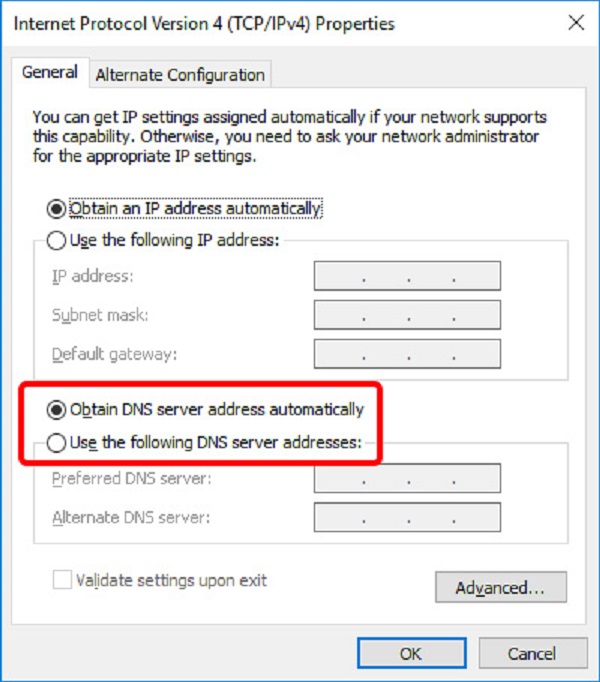
- Click on IPv4 and select Properties.
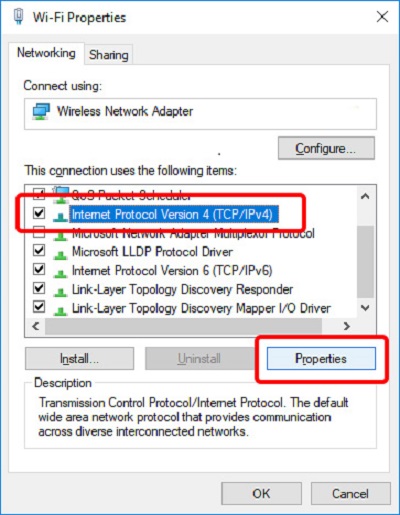
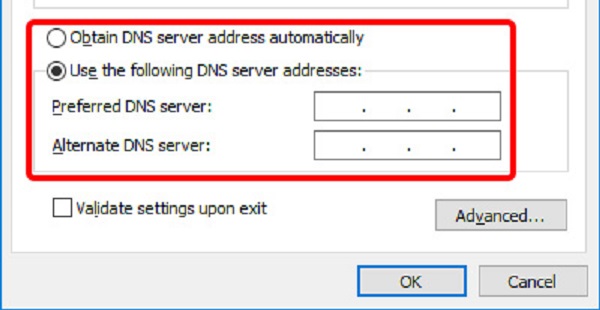
- If “Obtain DNS server address automatically” is selected, click the radio button next to “Use the following DNS server addresses:”
- Enter the DNS server addresses you want to use. Put in both addresses (Preferred and Alternate.)
- Click on Ok and Close.

And you have now successfully upgraded your DNS server settings.
Do you Disce? iDisce!